 Deutsche Version
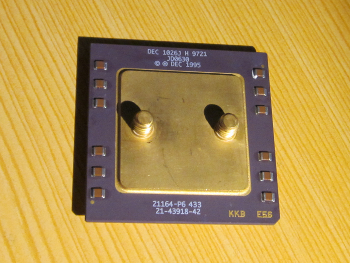
| Picture 1 - This chip started my Alpha project. Bought as scrap in the 'bay, it is still fully operational. |
|
So, what to do with a naked AlphaPC 164LX board? For me the first goal is (of course) to put Debian Linux on it... there are quite good tutorials about this in the web so I omit the installation procedure here just giving some hints where problems arised.
I used the first serial port on the board (that's the upper of the two DB9 plugs). Connected it via a null modem cable to a PC running a terminal emulator, same way as for my PDP-11. A common PC style ATX PSU plugged into the power connector of the Alpha board and up & running was the SRM console.
|
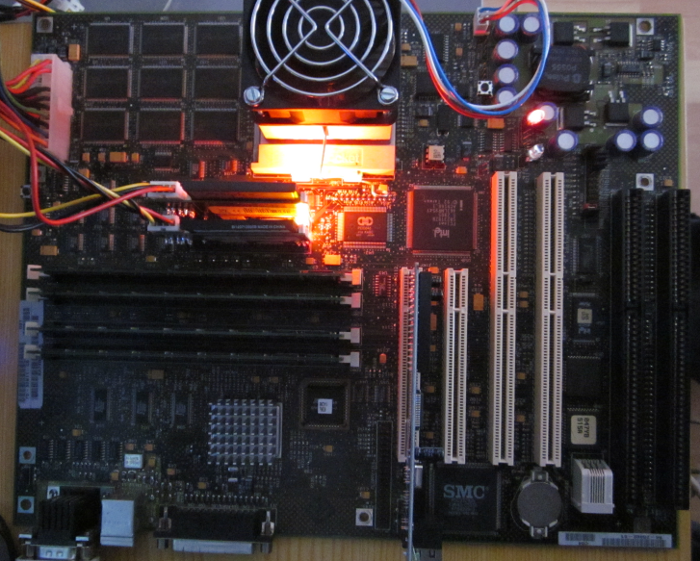
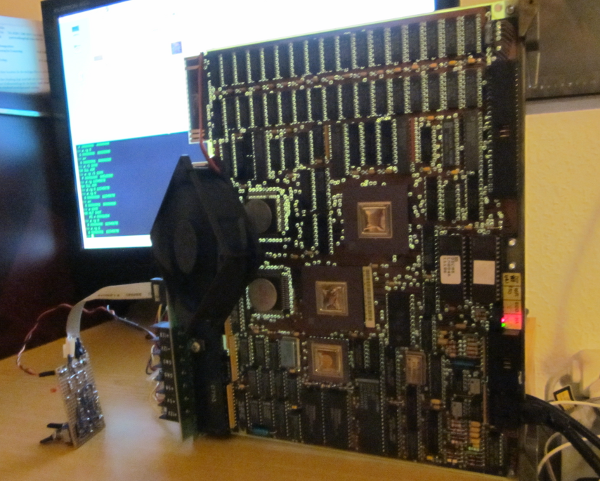
Picture 2 - The AlphaPC 164LX viewed from above. Characteristic pattern by L3 cache chips is upper left edge of the photo. I used two CF cards in IDE adaptor boards in place of true HDDs, their control leds light up half of the board. In one of the PCI32 slots there is an old Realtek 8139 ethernet card (hard to see, just the edge) which is detected by the OS. |
|
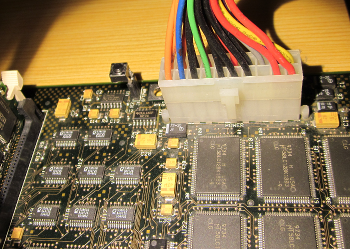
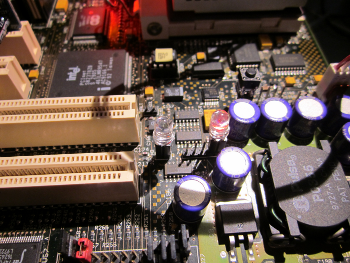
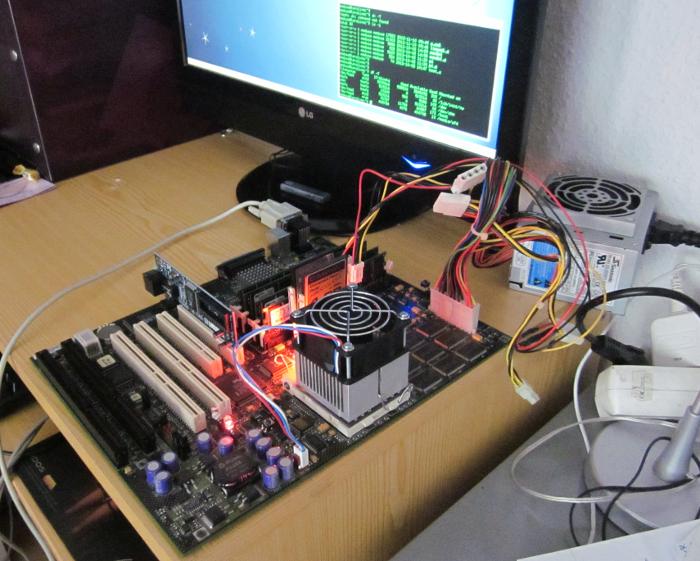
Picture 3a/b - Besides the PC ATX PSU there should be at least a power button (left besides the 20-pin power connector). I also added a power led, a HDD led, and a reset button (left photo). All buttons/leds I soldered onto pieces of IC sockets and plugged them directly to the pins on the board. |
|
For the first boot I removed the DVD drive from my desktop PC and connected it to the secondary IDE plug. The Debian installer DVD boots quite nice from it using the SRM command "boot dqb0 -flags 1".
On the primary IDE bus I plugged a CF adaptor holding an 8GB card. A poor girl's SSD in a way, it is way enough for such an old machine.
At first all this worked quite well. Debian installed automatically on the 8GB CF card. Just the install screen looked a bit funny via the monochrome terminal/ serial interface screen but no problems so far. Just rebooting after the installer finished did NOT work. I tried a number of tips and tricks from the Alpha Linux nerd forums around the web but nothing helped. Even partitioning of the drive in BSD mode was a fail.
Booting from installer DVD still worked well, and a change to rescue mode, open a shell and a "chroot" to my CF card filesystem did as well. Thus, my filesystem was ok just the bloody SRM didn't want to boot it. Which, on the other hand, it did from an ISO file system... hmmmm...
Alas, the solution was to set up the /boot partition as its own ISO disk. I copied /boot from the 8GB card to my PC (using a multi card adaptor that's a lot easier than to change an entire HDD). Made an *.iso image of /boot by a common CD burner app (use your favourite one, doesn't matter as long as it does ISO9660 format). Next step is done by the tool "isomarkboot" which makes the *.iso bootable on an Alpha. The aboot loader has to be in the *.iso's root (from a Debian install, it already is; its name for the 164LX board is "bootlx").
On the shell then enter "isomarkboot mybootiso.iso bootlx" (substitute the name of your *.iso here). Before setting up the iso image I also customized some of the Linux kernel parameters in the file etc/aboot.conf. As I planned to run the board only via serial console, I put in here a "console=ttyS0" as a kernel parameter.
Last step was to "burn" the *.iso image to a second CF card. The smallest cheapest slowest card will do here for the iso size is just 100MB, leaving the rest of the CF card unused.
Of course, also a real burn of the *.iso image to a CD is possible. Tried it, too, worked the same way as a CF card adaptor on the secondary IDE. Just my desktop PC wanted its DVD drive back. ;)
|
Picture 4 - AlphaPC 164LX board running under Debian Linux. Left in the back the serial null modem cable. A window running a terminal emulator is visible on the desktop flatscreen. Serial is running 9600 baud, 8bit, no parity, 1 stopbit (default). Stylish black-green VT102 which I use normally for my PDP also fits the 15 year old Alpha well, too... |
Yes, and now, what to do with it... of course I did a performance test with linpack. I was surprised the Alpha has quite a power, it keeps close to the results of newer ARM based machines such as the iPad 1 or a Wii.
Using the full 1GB ram even a 10,000x10,000 Matrix fits, but it takes the 21164 CPU about 1.5 hours to do the LU decomposition of it.
Missing: a case. A small 2HU one would be nice. Like very much the style of the AlphaStation 500 ones...
|
Picture 5 - Probably the weirdest VAX found in the web: my H9281 dual backplane (from my PDP-11/03) removed from its card cage for otherwise a quad module will not be able to get a mechanical fit. The naked backplane can't lie on it bottom side or else the wire-wrap pins will bend and produce shorts. Thus, the uVAX II CPU with the dual backplane only on its AB fingers is turned by 90 degrees here. Left end hangs the little control board from the PDP. Important: the uVAX must get forced air cooling. Without both the 78032 and 78132 chips become to hot to touch after a few minutes. Not good as every owner of an overclocked graphics card knows, too. Semiconductors live the longer the cooler they're kept. Cooling here is done by a free-hanging PC case fan which blows air to the both mushroom-shaped heat sinks. Behind the board there is my PC flatscreen with a terminal emulator - again, stylish black and green. |
|
Also the serial console interface can use stuff from the PDP-11. It has same pinout as the serial interfaces on a DLV11-J quad serial card so I already had cables for it - see my PDP-11 page for it, too.
All else connectors of the CPU board can be left unconnected for a first test. This is like logical zeroes on the pins and means:
|
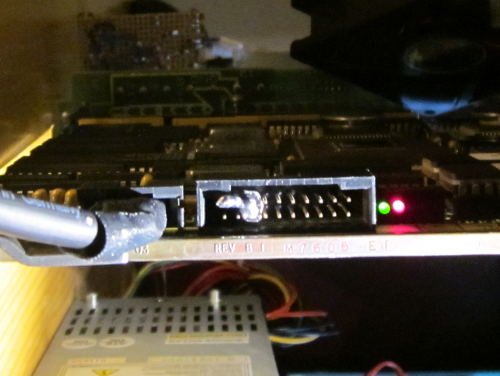
Picture 6 - A view to the "L" special jumper I soldered from an IC socket. It is plugged to J2 and pulls HLT ENB pin and two of the serial config pins to ground (means a logical "1" in the inverted input logic). CPU boots to console mode immediately and doesn't try to find some physical boot device. Baud rate is 9600 which is standard for PC connection. Refer to the KA630 user guide for details. Left of connector J2 my serial cable from the DLV11-J board reused here. Right of it the status leds of the uVAX. Green indicates DC_OK, the four red leds are the console status. In halt mode it displays an "8", binary "1000" or "on-off-off-off". |
At the serial terminal emulator there can be done queries of memory or internal CPU registers just like the PDP-11 but with a bit more comfort. "e" is for "examine" and prints hex values, "d" is "deposit" for writing hex into registers or addresses. "s" starts a small program which was toggled in to a memory location. First thing I did was to check for the memory size just like I did for the smaller PDP11:
P  00001000  D4 50          <--- R0 = 0
P  00001002  90 80 51       <--- Load R1 from adress in R0, increment R0
P  00001005  11 FB          <--- ...and loop back to the previous comand
The "P" the listing shows indicates a physical RAM location (the console uses "G" for general purpose registers and "I" for internal registers).
Alpha:
[1] Alpha 21164 Microprocessor Hardware Reference Manual, DEC, Maynard, Massachusetts 1996

[2] Alpha 21164 Microprocessor Data Sheet, Maynard, DEC, Massachusetts 1996

[3] AlphaPC 164LX Motherboard Technical Reference Manual, Compaq Computer Corporation 1999

[4] AlphaPC 164LX Motherboard Tru64 UNIX User's Manual, Compaq Computer Corporation 1999

[5] Alpha Architecture Reference Manual 4th Edition, Compaq Computer Corporation 2002

MicroVAX:
[6] KA630-AA CPU Module User's Guide, DEC 1986

[7] VAX-11 Architecture Reference Manual, Revision 6.1, DEC 1981

[8] MicroVAX II 630QY, 630QZ Operation, DEC, Maynard, Massachusetts 1986